Re: Modelling Spiral Stair 1
BALLUSTERS AND RAILINGS
Step 9 - Balluster and Handrail Profile
- Create now your ballusters in 3d and handrail profile, save it a hide it for the meantime
- Create now your ballusters in 3d and handrail profile, save it a hide it for the meantime

Step 10 - Handrail Referencing
- Go now to stair front view, copy and move the 2 helix at 900mm up ( you may refer the exact location of this
base on your design), Hide the original for future reference.
- Go now to stair front view, copy and move the 2 helix at 900mm up ( you may refer the exact location of this
base on your design), Hide the original for future reference.

Step 11 - Helix Offsetting
- We need to offset the helix so that our railings will not fall the stair edge.
- Select the helix ( you may choose any of the two, in my case i select first the bigger one), double click on it
or press CTRL 1 to activate its properties.
- Change its Bottom and Top Radius ( refer this to your design, in my case i offset it 75mm away from the edges)
- Do it also the other helix

Step 12 - Establishing the Ballusters Location
- Now on isometric mode ( or in your top view) divide the helix into 40 units
- Do the same procedure with the other.
- Then erase the points you dont need
- Now on isometric mode ( or in your top view) divide the helix into 40 units
- Do the same procedure with the other.
- Then erase the points you dont need


Step 13 - Creating the Balluster Blocks
- Create new layer ( any name will do)
- Then any viewport ( front view in my case) select one reference point, change its layer to the new one you have created
- Then make it as block ( perform block command)
- Create new layer ( any name will do)
- Then any viewport ( front view in my case) select one reference point, change its layer to the new one you have created
- Then make it as block ( perform block command)

Step 14 - Distributing the Block to the Reference points
- Go into isometric mode, with the help of the snap tools, copy and distribute the blocks into the
reference points along the helix line
- Go into isometric mode, with the help of the snap tools, copy and distribute the blocks into the
reference points along the helix line

Step 15 - Baalluster Block Editing
- Unhide now the ballusters you created, copy one profile ( control C not the copy tools of Autocad)
- Double click on the block you have created earlier to bring up the block editor dialog box
- Unhide now the ballusters you created, copy one profile ( control C not the copy tools of Autocad)
- Double click on the block you have created earlier to bring up the block editor dialog box

Step 16 - Finalizing the Balluster Block
- On Block Editor dialog box, paste now now the balluster ( Control V ), arrange it position it. You may want to check the base point of the block if its properly alligned, you can go to 3d view mode and rotate the scene, then recheck.
- On Block Editor dialog box, paste now now the balluster ( Control V ), arrange it position it. You may want to check the base point of the block if its properly alligned, you can go to 3d view mode and rotate the scene, then recheck.

Step 17 - Final Balluster
- Closed and accept the changes. Do again the procedure in case the balluster is not properly alligned
- Closed and accept the changes. Do again the procedure in case the balluster is not properly alligned
Re: Modelling Spiral Stair 1
Step 18 - Handrails
- Copy now the handrail profile and paste it on the helix starting point.
- Go to isometric view for proper alligning
- use 3drotate command if you need to fine tune its orientation
- Sweep it to the helix
- Copy now the handrail profile and paste it on the helix starting point.
- Go to isometric view for proper alligning
- use 3drotate command if you need to fine tune its orientation
- Sweep it to the helix

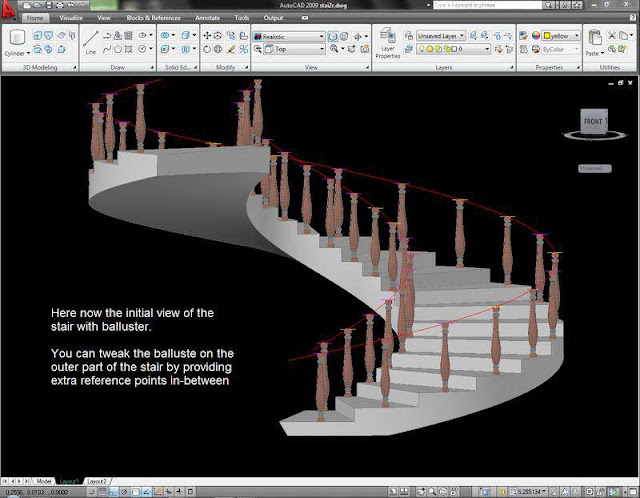
And now the finish Stair with railing, i added some more ballusters on the outer part


thanku good luck
No comments:
Post a Comment
මේ ලිපිය ඔයාලට ප්රයෝජනයක් උනානම් Comment එකක් දාලා යන්න අමතක කරන්න එපා... ඔයාලගේ Comment ඒක මට ලොකු හයියක් මේ මගේ අඩවිය දිගටම කරගෙන යන්න. හිතට එන ඕනම අදහසක් නිදහසේ කියන්න. මට බැන්නත් මම තරහ නෑ... අකමැත්තක් නැත්තම් Follow කරලා මගේ අඩවියට Join වෙන්න... බල කරන්නේ නෑ... කැමති නම් විතරයි...